Saturday, December 14, 2013

Meyer Lemon-Cranberry Cornmeal Muffins

just think of lemons...
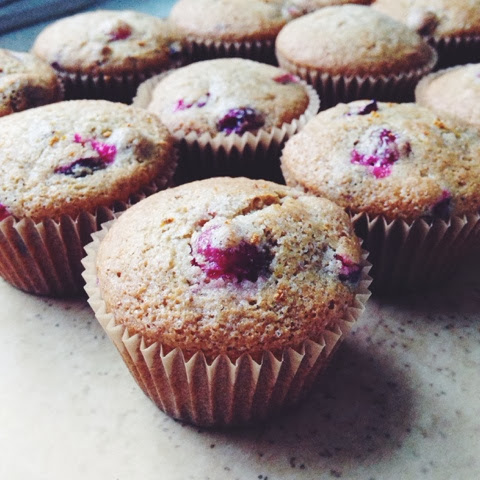
Meyer Lemon-Cranberry Cornmeal Muffins.


had a friend growing up whose mother used to tell her, whenever things were a little less than perfect, to "just think of lemons." As angsty, jerky teenagers we found this advice more amusing than helpful. But now, as a marginally functional grown up, I'm finding that it actually works. While I do love a good "I'm not leaving the house at all" snow day, winter as a whole bums me out. It gets dark at 3:30 in the afternoon, the car is frozen shut every other morning and my toes are numb and frozen pretty much always. When Meyer lemon season starts things feel a little bit (metaphorically) warmer. 
So when life gives you a seemingly endless frozen tundra, 
think of lemons.
And when life gives you lemons, make muffins.
Or, as a wise man from Minnesota once said, paint that shit gold. 

Cranberry-Meyer Lemon Muffins
(makes approximately 15 muffins)
1/2c all purpose flour
1c whole wheat flour
3/4c cornmeal
2/3c organic sugar
1tbsp baking powder
1tsp baking soda
1/2tsp salt
1tbsp apple cider vinegar
1.5tsp vanilla extract
1 1/2c halved fresh (or frozen) cranberries
1/4c raw walnut pieces (optional)
2tsp grated meyer lemon zest
1c unsweetened non-dairy milk
1/4c meyer lemon juice
1/4c canola (or other neutral) oil
1/2Tbsp extra sugar for dusting tops of muffins

Preheat oven to 400 degrees
Line muffin tin with paper liners.
Measure out 1 1/2c of cranberries, cut each in half, toss in a small bowl, set aside.

In a medium mixing bowl combine flours, baking powder, baking soda, salt
and 1/3c of the sugar, whisk to combine.
Add the remaining 1/3c of sugar and 2 tbsp of the dry flour mix to the cranberries and toss gently until cranberries are well coated.
Stir in 1 1/2tsp of the lemon zest.
Add non-dairy milk, lemon juice, vinegar, oil and vanilla extract to flour mix.
Stir until well combined.
Add in walnut pieces.

GENTLY fold cranberries into wet mix.
If using fresh, be more aggressive, but the frozen will bleed.
Fill muffin liners 2/3 full and shake pan gently to distribute.
Sprinkle the tops of each muffin with a pinch of sugar and reserved 1/2tsp lemon zest.
Bake for 12-15 minutes, until tops are light golden brown and
tester inserted into the center comes out clean.


Wednesday, December 4, 2013

Spiced Lentil Stew with Preserved Lemon

always be prepared.
Spiced Lentil Stew with Preserved Lemon
Oh yes. And I didn't even have to leave the house.


Otherwise known as "why I always have lentils on hand" stew. This is me, singing the praises of a well stocked pantry. Because, if you're prepared, on those it's too cold (or I'm too lazy) to go outside days or on those there's nothing in the fridge days,
there is ALWAYS the possibility of soup.
So stock up.
And try this recipe.
It's a good one.

Using up the heirlooms, but regular ol' orange carrots work just as well.


Spiced Lentil Stew with Preserved Lemon
(serves 4)

2tbsp olive oil
1 1/2c brown lentils, rinsed
1/2 small onion, diced
1/2 leek, sliced thinly
3 garlic cloves, minced
4 medium carrots, peeled and sliced into discs
2tsp sea salt
2 1/2tsp chili powder
1tsp turmeric
1/2tsp black pepper
1/2tsp finely minced preserved lemon
4c unsalted vegetable stock
1/2c crushed tomatoes
1/2 lemon, freshly squeezed

Trim and thinly slice leek into half discs, reserving a generous pinch of the
brightest greens for garnish.
Sautee diced onion, leek and garlic over medium heat for 2-3 minutes 
until onions become translucent. 
Add carrots and sautee for 1-2 minutes longer.
Add chili powder, turmeric, salt, pepper and preserved lemon.
Cook 1-2 minutes longer, stirring frequently, until mix is fragrant. 
Add stock, lemon juice and tomatoes.
Stir to combine. 
Increase heat, bringing stew to a gentle boil, then reduce heat to medium-low.
Cover and simmer for 30-35 minutes, stirring occasionally.
If soup becomes too thick, add a small amount of water during cooking.
Remove bay leaf and adjust seasoning to taste.
Garnish with reserved sliced leeks and crushed red pepper when serving.

Gorgeous ingredients, soon you will be soup.


Wednesday, November 27, 2013

vegan thanksgiving recipe round-up

STOP STRESSING!
Thanksgiving-ish Recipe Round-Up.

Have a seat, take a breath and check out these relatively simple, plant based recipes.
Including a few for breakfast. 
'Cause, you know, most important meal of the day and all...

Vegan Pumpkin-Walnut Sticky Buns

Monday, November 25, 2013

rosemary-balsamic roasted sunchokes & beets

because winter is long and one can only eat so many turnips...
Rosemary-Balsamic Roasted Sunchokes & Beets
Roast-y, root-y, gorgeous.


There are a lot of roots out there and it's time to start eating more of them. Over the past few years I've taught myself to love a long list of previously maligned and ignored tubers. Radishes are now a current obsession of mine; the mere thought of a world without them gives me panicky heart palpitations. Turnips and rutabagas have become an inexpensive winter go-to. Even the intimidating and somewhat confusing celeriac has made it in to the rotation. 
But sunchokes have held a steady, lonely spot on my "learn to love" list for too long. 
Time for a change.
So...
What's the best way to dip a proverbial toe in the water with this little root?
Roasting of course. 
And let's throw some beets in, for good measure.  

Beets and sunchokes, pre roasting.


Recipe notes:
Sunchokes do not need to be peeled (hooray for less work),  
just make sure to scrub them thoroughly before slicing. 
I used heirloom beets in the original recipe, but red beets would work just as well. 
Though be prepared for a little more color bleeding (read: pink roasted sunchokes).

Balsamic-Rosemary Roasted 
Jerusalem Artichokes & Beets
(serves 4)
1 bunch of medium beets (about 4-5), 
scrubbed and peeled
2 large sunchokes, washed and scrubbed
2Tbsp olive oil
1Tbsp balsamic vinegar
1/4tsp sea salt
2 large sprigs fresh rosemary 
(approx. 2Tbsp)


Preheat oven to 400 degrees. 

Rinse, pat dry and finely mince rosemary leaves.
Wash and scrub Jerusalem artichokes thoroughly and slice into roughly 1" pieces.
 Slice each beet into 1/2" wedges.
Whisk together olive oil, vinegar, sea salt and 1Tbsp of the fresh rosemary.
Place sunchokes and beets in a large mixing bowl; add dressing, toss to combine. 
Spread coated sunchokes and beets evenly onto a large rimmed baking sheet.
Roast for 35-40 minutes, flipping halfway through to let the 
sunchokes brown on both sides.
Test for doneness by poking them with a fork.
If it goes in easily, they're done.
Sprinkle the reserved rosemary over top before serving. 


Tuesday, November 5, 2013

Vegan Pumpkin-Walnut Sticky Buns

tuning out the (orange) noise...
Pumpkin-Walnut Sticky Buns.
Ending my seasonal pumpkin boycott.

We all suffer from pumpkin fatigue this time of year. You can't take half a step without running into something that has no business being pumpkin flavored.
I mean, pumpkin candy canes? Seriously??? That's just gross.
This annual pumpkin over-stimulation (not as dirty as it sounds...) reaches it's peak right around the week before halloween and doesn't let up until the thanksving leftovers are gone. So, as a result, I'm on a passive pumpkin boycott from October to December. I usually make one holiday pie of the pumpkin variety and that's it.
But the thing is, I ACTUALLY LIKE PUMPKIN.
So this year I'm tuning out the (orange) noise.
This year I'm making/eating pumpkin things.
Not because everyone else is, but in spite of it.
So there.
And it all starts with sticky buns...

Risen dough, turned out onto a prepared work surface.

Recipe notes
This is a slight modification of my original sticky bun recipe. Which is, in turn, a variation of this soft pretzel recipe.
Keep on evolving, folks! 
If using fresh pumpkin more power to 'ya but the moisture content is a bit higher, so you might need to add a little extra flour to keep the dough from getting too sticky. 
If whole wheat floats your boat, sub out 1c of  all purpose for 1c whole wheat flour.
The recipe calls for a stand mixer, but with more elbow grease it can be done by hand. 
You can find hand mixing instructions in the 
original soft pretzel recipe.  


Topped and ready to be rolled and sliced.

Swirly goodness.


Pumpkin-Walnut 
Sticky Buns
(makes 7-9 large rolls)

For the dough:
4c all purpose flour
1/4c pumpkin puree 
1 1/4c warm water
1 Tbsp active dry yeast
1/3c  + 1 tsp organic sugar
1/2tsp sea salt
1Tbsp olive oil

extra oil for greasing the bowl

For the sticky bun filling:
1/4c room temp vegan butter
1/3c packed light brown sugar
2 Tbsp ground cinnamon
1/3c raw walnut pieces
1tsp ground nutmeg (optional)

extra butter for greasing baking dish and topping pre baked rolls

Measure 1 1/4c warm water into the bowl of a stand mixer fitted with a dough hook.
Sprinkle in the yeast and 1tsp of the organic sugar and whisk to combine.
Proof yeast mixture for 10 minutes or until frothy.
Add flour, remaining 1/3c of sugar, sea salt, pumpkin puree and olive oil to the bowl.
Mix at low to medium low speed for approximately 8-10 minutes.

You may need to stop the mixer occasionally to scrape the dough 
off of the hook or the sides of the bowl.

Time for the oven.

The dough should be smooth, elastic, not sticky and  pull away easily from the bowl.
If  too dry, add water a few drops at a time.
If too wet, add extra flour a pinch at a time.
Once dough is mixed, roughly form into a ball and place in a large well oiled bowl.
The dough will roughly double, so be sure your bowl is large enough.
Cover with a tea towel or plastic wrap and allow to rise in a warm dry place (inside of an unheated oven with the light on works perfectly) for 1 hour.

Grease a 8" square or round glass, ceramic, or heavy duty aluminum baking dish
Preheat oven to 400 degrees. 

Turn dough out onto a lightly floured work surface. 
Shape roughly into a rectangle.
Use a lightly floured rolling pin and roll dough out until it is about 1/4" thick,
maintaining the rectangular shape of the dough. 
Using your hands, spread the 1/4c of butter over the surface of the dough. 
It is ok if there are larger bits of butter here and there, just make sure that the butter 
covers the entire surface of the dough, up to the edges. 

Sprinkle the brown sugar over the butter covered dough, covering the entire surface. 
Do the same with the ground cinnamon and nutmeg.
Sprinkle walnuts over top, lightly pressing them down into the dough. 
Roll the dough, from the longer end, into a tight cylinder. 
Do not apply much pressure to the dough while rolling, 
but make sure it is tight enough where all of the layers are touching.
Use a pastry cutter or sharp knife to divide the rolled dough into 7-9 equal sized pieces, depending on desired thickness.
Place the sliced rolls into the prepared baking dish and top with a few bits of butter.
Bake for 15-18 minutes or until golden brown on top.

Oh yes, this will do.


Monday, November 4, 2013

Raw Fennel-Balsamic Marinated Carrot Ribbons

because sometimes you need to bring the fancy...
Raw Fennel-Balsamic Marinated Carrot Ribbons.
The very fanciest of (carrot) pants.


It's time to up your carrot game a little. Shredded, sliced, raw and roasted are all tried and true, but ribboned? That's new and exciting territory. Fancypants territory. Just arm yourself with a vegetable peeler and get ribboning. If you can get your hands on heirloom carrots a) lucky you! and b) use them! The colors are gorgeous and the flavors are more complex than a traditional carrot. That said, any carrot will work in the recipe, just be sure they are at peak freshness. Once marinated, the carrots are a bright and flavorful addition to sandwiches or salads and make for a stunning side. 
Fancy raw carrots for Thanksgiving, anyone? 
We can't JUST eat biscuits and pie all day...

Oh yes, I brought the fancy.

Fennel-Balsamic Marinated Carrot Ribbons
(makes about 2 cups)

3-4 medium sized carrots, scrubbed and peeled
2Tbsp extra virgin olive oil
1Tbsp balsamic vinegar
2tsp dried or fresh fennel
1tsp fennel seeds
1/4tsp organic sugar 
1/4tsp sea salt
black pepper to taste
Using a vegetable peeler, peel carrots lengthwise into ribbons.
In a large bowl, whisk together oil, vinegar, sugar and salt.
Add carrot ribbons to bowl and stir, or use your hands to combine. 
Sprinkle fennel and seeds over the top and give it a quick stir.
Cover bowl tightly and allow to marinate in the fridge overnight. 
Will keep for up to a week in the fridge. 

Wednesday, October 23, 2013

Raw Vegan Coconut Cheesecake Bites

i want to be the girl with the most cake.
or just enough cake, really...
Raw Vegan Coconut Cheesecake Bites. 
Little bitty nutty miracle, this thing is.
will spare you from having to read yet another flowery blog post singing the praises of  cashew cheesecake. Its a damn miracle and we all well know it.  I have a few brief things to say on the subject and then you can get down to the very important business of making, and eventually eating, cake. There are a lot of fantastic raw cheesecake recipes out there, but almost all of them are for special occasion, party of eight, birthday-sized cakes. That's all well and good, but if you're not throwing a party or not in the mood to spend thirty dollars on dessert (all of those raw food components can get a bit pricey), those recipes aren't going to work. Also, I'll let you in on a little secret. Unlike your standard carb-y sugar bomb, raw cheesecake is healthy, nourishing and FILLING. So this recipe is on a mini scale. 'Cause a little goes a long way and 
'cause mini raw foods are adorable.
Oh and I almost forgot, you can eat them for breakfast.
Cheesecake. For breakfast.
So there's that.

This recipe is an adaptation from the always inspiring Choosing Raw.

Raw cashews, measured and ready for soaking.

Recipe notes:
I use a standard silicone 1" peanut butter cup mold, which yields 12 mini cake bites.
For slightly larger cakes try silicone mini or standard muffin cups or a small spring form pan.
You can also use a plastic mold, though the cakes might be more difficult to pop out.

Raw Vegan Coconut Cheesecake Filling
(makes 12 1" cake bites)
1/2c raw cashews
1tbsp agave*
2tsp raw coconut oil
1/4tsp vanilla extract
1/8tsp sea salt
2tsp lemon juice

*you can also use maple syrup, though it is not raw.

Date-walnut crust, fully blended.


Date-Walnut Crust
4 pitted dates
1/3c raw walnuts
2tbsp raw flaked coconut
2tsp raw flax seed meal

Extra flaked coconut for garnish

To prepare filling:
Soak cashews in filtered water for 2-3 hours.
Drain water and discard.
 Place cashews in a blender or food processor.
Add all other filling ingredients and blend
until smooth.
Set aside.


To prepare crust:
Combine all ingredients in the bowl of a food processor and process until mix is made up of only small crumbs
and holds together when pressed in your hand.

Coconut-topped medium sized tarts.

Press the crust into the bottom of each cake mold.
Spoon in cheesecake filling and shake to distribute.
Use a spatula to smooth out the tops then add extra flaked coconut for garnish.
Transfer mold to the fridge and allow to chill for 1 hour.
Once chilled, pop cake bites out of the mold and enjoy!
Store any extras in the fridge.

Yeah, they really want you.
They really want you.
They really do.

Wednesday, October 16, 2013

Raw Walnut Milk and Raw Walnut Alfredo


(better) late (than never) to the party...
Raw Walnut Milk
and
Raw Walnut Alfredo Sauce.
Freshly blended walnut-y perfection.


Walnut milk came as something of a surprise to me. Until about a week ago I had regarded walnuts as too precious a commodity to milk-ify. Oh, how wrong I was... Over the course of the last decade and a half I've tried (and tried making) just about every other kind of non-dairy milk under the sun. After all those years of mad-scientist experimentation, hemp milk became the homemade go-to in my household. It served it's purpose but, while I dig the taste of hemp seeds, I never quite fell in love with raw hemp milk. It lacked the creaminess of store bought and the taste was always a little... off.  But I dutifully made it each week and saved the pulp for raw crackers or cheese or sauce. Meh. Then last week I found myself hemp seed-less and a light bulb went off. Why couldn't I do the same with walnuts? So I did. And it was glorious.
Turns out raw walnut milk is pretty much perfection. Go figure.
And then there's the walnut pulp Alfredo...
*swoon*
Raw. Vegan. Alfredo.
Need I say more?


Soaked walnuts, ready to be blended.

 
Raw Walnut Milk
5c filtered water + extra for soaking
1c raw walnuts
2 pitted medjool dates
1/4tsp sea salt
1/4tsp vanilla extract
 
Place raw walnuts in a small bowl, cover with filtered water, soak for3-6 hours.
Drain soaked walnuts and discard water.
Place nuts, dates, salt and extract into blender or milk maker.
Add 5c water.
Blend until smooth or use set milk maker to raw.
Once blended, strain mixture through a cheesecloth or nutmilk bag, reserving pulp.
If using a milk maker, simply pour off milk and reserve pulp.


And then there was this...
 
Walnut Alfredo with whole wheat pasta, kale, artichokes and fried tofu.
Yes, it was as good as it sounds.
 

Raw Walnut Pulp Alfredo Sauce
(serves 2)
Reserved, strained walnut pulp (should measure about 1/2c)
3Tbsp nutritional yeast
1/2tsp sea salt
1 clove garlic
1/4tsp nutmeg
1/2tsp ground black pepper
1Tbsp reserved walnut milk (more as needed)
Dash of dried oregano (optional)
 
Combine all ingredients and blend until smooth.
Add more walnut milk as needed for creaminess.
Serve over raw or cooked noodles.


Monday, October 14, 2013

Raw Coconut-Vanilla Chia Pudding

insert chia pet commercial joke here...
Raw Coconut-Vanilla Chia Pudding. 

Raw coconut vanilla chia pudding served with walnuts, sliced peaches and hemp seeds.


Being a child of the 80s made coming to terms with the whole chia pudding concept rather difficult. Until recently I had only ever experienced chia in pet form, gooey little seeds slathered onto a terra cotta sheep for novelty sprouting. But, in spite of what TV infomercials would have us believe, there is much more to chia than giving fuzzy green fur/ hair to ceramic animals and Mr. T heads.
Chia seeds are nutritional rockstars, ridiculously full of fiber, protein and vitamins, and they happen to make an outstanding pudding. The seeds thicken when soaked in liquid, giving them a texture similar to that of tapioca. Add a little sweetener, a little vanilla, a pinch of salt and you've got a crazy good (and good for you) pudding that can be enjoyed guilt-free any damn time of day.
Pudding for breakfast?
Don't mind if I do.


Maple syrup measuring time. 

Coconut-Vanilla Chia Pudding
(serves 2-3)

 1c light coconut milk
3Tbsp raw chia seeds
1" of a vanilla bean, scraped
or
1tsp vanilla extract
1/4tsp sea salt
1tbsp maple syrup
or
agave syrup

toppings 
suggestions:
raw walnuts
almonds
coconut flakes
cacao nibs
sliced fruit
berries
hemp seeds


In a medium bowl combine chia seeds, sea salt and maple syrup.
Split vanilla bean segment lengthwise and, using the backside of knife, scrape the seeds from inside the pod and
add to mixing bowl.
You can also drop the scraped pod into into the mix for a stronger vanilla flavor. Simply leave pod to soak with pudding then remove before eating.
Add coconut milk, whisk to combine.
Let sit for 5 minutes.
Whisk again, cover tightly and place in the refrigerator for at least three hours until thickened.
Serve with fresh fruit, nuts or seeds.


*Recipe Notes*

Read ingredients when shopping for coconut milk as many brands contain additives and thickeners. My favorite is Trader Joe's canned light coconut milk. It contains only coconut milk and water and is a great value at about $1 per 14oz can.
If you find that your pudding has become overly thick after setting,
add a bit more coconut milk and stir to combine.
Alternately, if it is too thin add a small amount of extra chia seeds to thicken it up.

More ways to eat chia pudding: with raw walnuts, hemp hearts and a sliced fresh fig.


Friday, September 6, 2013

Summer's End Ratatouille

way, way easier than pie 
(that whole easy-as-pie thing is kind of a misnomer, right?)
Summer's End Ratatouille 
Now that's a sexy pot of summery goodness, am I right?

The days of seasonal zucchini, eggplant and tomatoes are numbered, so let's get a little hedonistic with the last of summers bounty shall we? Let's grab everything that's left and eat big ol' piles of stewed vegetables for days and days and days. Yeah, I know. You're probably thinking (or screaming), can we please talk about anything around here besides the inevitable end of Summer? No. Sorry. For now at least, the answer is no. I can't think of a better way to enjoy these waning produce-filled days than with ratatouille. It is, in my humble opinion, a perfect dish. Almost embarrassingly simple, it comes together in a snap, combines the very best produce of the season, and the versatility can't be beat. It can be enjoyed hot or cold, served all on its own or as a side, pair it with pasta or, better yet, a loaf or crusty bread brushed in olive oil. It can even be frozen and enjoyed on those previously
(and endlessly) discussed dark winter days. 

Some ratatouille ingredients, ready for slicing.

*recipe notes
Some recipes call for a finer dice on the vegetables, but I prefer chunkier as the flavors and, more importantly, texture of the individual veggies can get lost with a finer dice. Use what's available! I think ratatouille is more of an outline than an acutual recipe; you can use different types of squash, leave out some ingredients (peppers for example), add in others, you get the idea. The chunkier dice will also help the vegetables maintain their integrity if you plan on freezing. The texture of the dish will change slightly if frozen and reheated. It will be more stew like, but still delicious. I'd suggest doubling or tripling the recipe if you plan on freezing, because why the hell not?


Summer's End Ratatouille
serves 4-6 (or 2-4 if you're me and mine)

3Tbsp olive oil
1Tbsp red wine (optional)
1 large onion (yellow or sweet), thinly sliced
1 head of garlic, cloves finely minced
one bell pepper, green red or yellow, sliced thin
Diced eggplant, about 3-4 cups
1 large zucchini, halved lengthwise and cut into thin slices
3-4 medium-sized tomatoes, diced (about 2c)
salt and black pepper to taste
1/2c shredded fresh basil leaves

Add oil to a large skillet or soup pot over medium-low heat.
Add onion and saute for 2-3 minutes until slightly translucent.
Add garlic and eggplant and continue to cook, stirring occasionally for 8-10 minutes.
Once eggplant has softened, add zucchini, peppers, tomatoes and wine.
Season with the salt and pepper 
and continue to cook, stirring occasionally, for another 8-10 minutes 
until all vegetables are tender.
Taste and adjust seasonings as needed.
Add fresh basil once cooking has completed, stirring some into the dish and 
reserving the rest for garnish. 

Then eat, eat, eat it until you can't eat no more.

Friday, August 30, 2013

Oven-Roasted Tomatoes with Herbs and Garlic

gather ye rosebuds (or tomatoes) while ye may.
Oven-Roasted Tomatoes 
with 
Herbs and Garlic
You won't get away from me that easily, Summer.

I don't want to panic anyone, but summer is drawing to a close. Soon fresh tomatoes will be nothing but shiny memories for us to cling to during the cold, gray winter months. So now is the time to go crazy, people. Throw caution to the wind and eat tomatoes by the fistful, morning, noon and night. And when you're not eating them, you should be preserving, preserving, preserving. My suggestion to you? 
Make and eat a batch of these every day until you can't stand it anymore. 
Then make more. 

Raw tomatoes, in olive oil and topped with garlic and
herbs, ready for the oven.

 
Recipe notes: 
The roasting concentrates the flavor of the tomatoes, making them incredibly rich and slightly smoky. Use whatever seasonal herbs you have on hand; thyme, rosemary, oregano and basil are my favorites. Eat them with crusty bread, toss them into a tomato sauce or use them to amp up the flavor of a summer ratatouille. Pack extra tomatoes in small jars (I used 4 oz mason jars), drizzle a little extra olive oil over the top and seal tightly. You can use any variety of tomato in this recipe. Just be aware that moisture levels vary quite a bit by variety, so cooking time isn't concrete. Smaller tomatoes can be halved; larger cut into segments. Be sure to use a large baking dish, 
giving the tomatoes enough space to roast without touching. 

Oven-Roasted Tomatoes

1 lb tomatoes (roughly 4-5 medium)
1 large clove of garlic, sliced thin
2Tbsp olive oil
2-3 sprigs of fresh rosemary, thyme or oregano
sea salt and black pepper

Preheat oven to 350 degrees. 
Drizzle 2Tbsp of olive oil into an anodized aluminum, glass 
or other non reactive baking dish.
Wash and core tomatoes, slicing them into halves or quarters, 
depending on their size. 
Place tomatoes, cut side down, in oiled baking dish.
Scatter herb sprigs and garlic slices over tomatoes.
Sprinkle with salt and pepper. 

Roast for approximately 2 hours. 
Cooking time will vary by tomato type, so keep an eye on them.

The finished tomatoes should be softened and wrinkled, with darkened edges. 
They will keep for a week in the fridge and about 6 months in the freezer. 


Roasted and packed for the freezer, ready to brighten any winter day.


Tuesday, August 27, 2013

Quinoa Fritters with Fresh Corn & Basil Salad

more ways to eat corn.
and quinoa, too. 
Sweet Onion, Corn & Basil Quinoa Fritters 
with
Fresh Corn & Basil Salad

When all else fails (or becomes tiresome), make fritters.

So... I bought too much corn. That's the long and the short of it. I ever so slightly (read: wildly) overestimated just how many ears would get eaten during a 7-person camping trip. Three per person seemed so very reasonable when standing before the massive corn pile at the local farm stand.  But no, three per person was not so reasonable. Three per person is how I wound up schlepping 20+ ears of corn from Boston to Maine, then 15 from Maine back to Boston. So it all began with the corn. More specifically the desire to expand the use of my overstuffed refrigerator beyond just corn storage. When all else fails, or becomes frustratingly tiresome (you couldn't pay me to eat another ear of grilled corn right now), make fritters. I've used this technique in years past when drowning in midsummer zucchini. Shred it, add a grain, some seasonings, a binder and fry those babies up. I'm here to tell you, the zucchini principal holds true for corn; these little fritters are damn tasty. Maybe even worth buying more corn for...

Hello empty vegetable drawers, how I have missed you. 
Time to hit the farm stand again. 

Fresh corn on the cob, grated and ready to be added to quinoa mix.

Recipe notes:
This recipe calls for removing corn kernels from the cob in two different ways. The first being grating (for the fritters), for which you simply shuck and de-silk the corn cob and grate it over the coarse part of a box grater. This will yield a (slightly messy) pulpy corn mash. The second (for the corn salad) being shaving the kernels from the cob using a kitchen knife. This New York Times video tutorial will show you two simple techniques for removing corn kernels.

Prepare quinoa well ahead of time, as it needs to cool completely beforehand. You could easily cook the quinoa the night before.


Quinoa Fritters with
Fresh Corn & Basil Salad
(makes about 20 small fritters)

For the Corn & Basil Salad:
1 cob of corn shucked and kernels shaved from cob
1/2c loosely packed torn basil leaves
1/4c minced sweet onion
1tsp apple cider vinegar
1tsp freshly squeezed lime juice
2tsp olive oil
salt and black pepper to taste
crushed red pepper to taste

Shuck, de-silk corn and shave kernels from the cob.
Whisk together vinegar, lime juice, olive oil, salt and pepper.
In a medium bowl combine basil, corn and onion.
Pour dressing over top and toss to combine.
Season to taste.


Forming quinoa mix into patties before frying.

For the Quinoa Fritters:
1c quinoa/ 2c water
1 cob of corn, shucked and grated (approximately 1/3c)
1/2c whole wheat flour
1/3c minced sweet onion
1/2c minced basil
2Tbsp ground flax seeds
 6Tbsp boiling water
2Tbsp nutritional yeast
2tsp sea salt
1tsp black pepper
1tsp crushed red pepper
1tsp paprika
Oil for frying

Rinse and drain quinoa. Heat a saucepan over medium heat. Add quinoa and toast for 4-5 minutes, stirring constantly. 
Add 2c water, bring to a boil, reduce heat to low and cook, covered, for 12-15 minutes. 
Allow to cool completely.

These are gonna be good.

In a small bowl, whisk together ground flax seeds and boiling water. Set aside and allow to thicken and cool. 

Place a box grater over a bowl or dish and grate corn lengthwise until all kernels are removed. You will wind up with a pulpy, liquid-y corn mash, measuring about 1/3cup.

In a large mixing bowl combine cooled quinoa, grated corn, sweet onion, basil, flour, nutritional yeast, salt, peppers and paprika. 
Stir to combine, being careful not to over mix. 

Add cooled flax mixture, stir gently until combined.

Season more as needed. 

Using a tablespoon, scoop out dough and gently form it into balls using your hands.
Roll in a little bit of flour, flatten into a patty and set in a single layer 
on a plate or baking sheet.

Heat 2Tbsp of oil in a heavy skillet over medium high heat. 
In batches, add fritters and cook for 4-5 minutes on each side until golden brown. 
Add more oil as needed. 

Serve with the corn and basil salad.