Thursday, November 29, 2012

No-Fail Vegan Cornbread

we all have our vices...
No-Fail Vegan Cornbread
I dare you to not eat it all. 
 I'm not going to lie. I ate an entire pan of this yesterday, and another is in the oven as I type this. It appears I may have a problem. I recognize that as far as vices go vegan cornbread is a pretty innocuous one, though complaints have begun to surface from other members of the household for my lack of "sharing skills". Hence batch number two. This is a pretty bad-ass recipe; you should make it. Its the perfect blend of sweet and savory and is a wonderful side for that vegan chili I posted yesterday.
The decision was made to stock up on local corn at the end of the season this year and freeze it up for winter use. Brilliant, right? Not so much. Only once this was done did I realize I'm not a super big fan of frozen corn. What to do? Cornbread! A 1/2 cup of fresh or frozen corn kernels really makes this recipe sing.

Homemade hempmilk turning into vegan buttermilk.
No-Fail Vegan Cornbread Recipe
1/2c whole wheat flour
1/2c all purpose flour
1c cornmeal
1/4c vegan sugar
1tbsp ground flax seed
3tbsp hot water
1tbsp baking powder
1c non dairy milk
1tsp white vinegar
1/2tsp salt
1/4c olive oil
1/2c corn kernels, fresh
or frozen

Preheat oven to 400 degrees then grease a 9" square baking dish.

Prepare your vegan buttermilk:
Measure out 1 cup of non dairy milk, add 1tsp white vinegar.
Stir gently and set aside for 10 minutes and allow to curdle.

Prepare your flax egg:
Combine ground flax seed with the 3tbsp of nearly boiling water.
Whisk mixture well and set aside.
Allow to sit until cooled and thickened, about 10 minutes.

In a medium mixing bowl combine flours, cornmeal, sugar, baking powder and salt.
Whisk together.
Frozen corn kernels, being incorporated into batter.
Add olive oil, vegan buttermilk, flax egg mixture, and corn kernels.
Stir well until all ingredients are combined.

Spread mix evenly into greased baking dish.
Bake on center oven rack for 20-25 minutes,
or until top is lightly browned and cake tester comes out clean.

Allow to cool then EAT!
Vegan cornbread, fresh out of the oven.

Wednesday, November 28, 2012

Vegan Black Bean Chili

On the Cheap:
Vegan Black Bean Chili

15+ years ago my mother clipped a recipe for black bean stew out of the local newspaper. It was right around christmastime, I was a newly minted teenage vegetarian, and she was looking for something a little different for holiday dinner. The recipe was decidedly un-vegetarian but with some substitutions and, not factoring in the mouth burns from excessive chili powder, we banged out a pretty good vegetarian stew. Every year since, when the weather turns cold,  mom still cooks up a big pot. There's always some waiting for me when, after a long drive down the east coast, I arrive home for Christmas. You might say its something of a tradition.

Clockwise from topL minced garlic, diced red peppers and spice blend. 
Once I was off on my own, and much in need of a cheap way to feed myself, I began making something similar, a vague approximation of quantities and ingredients. Over the years the recipe became more chili than stew and is now a staple in our house. When the cooler months roll around you're likely to find a big pot of this on our stove every week. Its a go to for parties, great and perfect for a veggie/omni mix crowd. I like to cook a big pot of polenta as an accompaniment. Creamy polenta atop a big bowl of chili is the perfect one-bowl meal.

Dried black beans and canned tomatoes are a pantry staple around here. I prefer the dried beans to canned, mostly as a cost saving measure. You can buy them in bulk or find cheap 1lb bags at a traditional grocery store. And whether its the more expensive organics or the cheaper option, canned tomatoes are a must have. I like to use a mix of diced and puree/juice in this recipe.
Pre cooked chili ingredients, ready to simmer for an hour or two.
Vegan Black Bean Chili Recipe 
(feeds 8-10)
11b dried black beans (approximately 6-7 cups cooked)
or
3-4 15oz cans
1 28oz can diced tomatoes in juice
or
1 28oz can whole peeled plum tomatoes in juice, diced or broken apart by hand
2 cups tomato puree
or
2 cups tomato juice

2 tbsp olive oil
1 medium diced yellow onion
3 cloves of garlic, minced
1 medium red bell pepper, diced
1 cup of water
1tbsp chili powder
1 1/2 tbsp cumin
1 1/2 tsp sea salt
1/4 tsp ground cloves
1tbsp Tabasco (you can add more/less)

Dried black beans, quick cook method:
Place dried beans in a colander and inspect for any small stones/ grit
Thoroughly rinse beans and drain
Place in 5qt pot and add water until beans are completely covered
Bring to a boil, boil for 2-5 minutes
Remove from heat and allow to soak on the stove overnight
Drain pre-soaked beans

If using canned beans, drain and rinse in colander and set aside

In a large pot heat olive oil over medium heat.
Add diced onions and saute for approximately 2-3 minutes, stirring frequently,
until they begin to appear translucent.
Add minced garlic, continue to stir for 2-3 minutes more.
Add diced peppers, chili powder, cumin, sea salt, and ground cloves.
Stir and cook for one minute more, until well incorporated and fragrant.
Add in cooked, drained beans or canned drained beans, stir to combine.
Add your tomato puree/juice, diced tomatoes, water and Tabasco,
stir to combine.
Bring all ingredients to a light boil, then reduce heat to low.
 Cover pot slightly; not tightly, just enough to catch splatter.
Simmer for approximately 2 hours, returning to stir every 20 minutes or so.
If the liquid has reduced too much, add a bit more tomato juice/water as needed.

Taste after cooking time is up to make sure your beans are cooked through.
Add more hot sauce according to your preference.

 I usually continue to fill this chili out for a couple of days, adding more cooked beans, tomatoes, and spices as we put a dent in the pot.

Great with a scoop of polenta, a crumbling of corn chips or cornbread over the top, and/or a sprinkle of cheddar daiya.
FYI, the daiya/corn chip combo?
Pretty hard to beat.
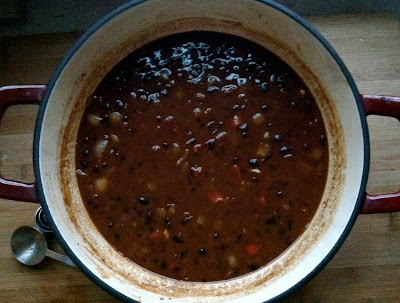
Finished chili with a side of no-fail cornbread. Yum.


Monday, November 26, 2012

Momufuku Soy Pickled Shiitakes

pickles n' punk
Soy Sauce Pickled Shiitakes 

Today I decided to listen to some Fugazi and pickle some things. Sometimes you can't fight the urge, you know? I believe punk to be the perfect pickling/canning music and I'd like to think David Chang would agree. So in honor of the great Ian MacKaye, and with all credit to Mr. Chang, I give you my adaptation of Momufuku's soy sauce pickled shiitakes.
Soy sauce pickles??
Pure genius.


Now, I'm not going to order you to make these immediately, but I will strongly encourage you to do so. A handful of these tossed into a big bowl of white miso with rice noodles is one of my go-to meals year round.
I've also added them to many a noodle dish, both cold and hot.

Perfect every time.

If possible, get yourself to the local Asian grocery for ingredients. I purchased an 8oz bag (that is a LOT of dried mushrooms) for $8.00, as well as my ginger and soy sauce (always good to have on hand).
Stock up!
Trust me, you'll be making this recipe again very soon.
 
Soy Sauce Pickled Shiitakes 
(slightly) adapted from Momufuku

3 Cups loosely packed dried shiitakes (pre-sliced or whole caps)
1/2c vegan organic sugar
1/4c unseasoned rice vinegar
1/4c apple cider vinegar
1/2c tamari or soy sauce
2 small 1/2" knobs of ginger, peeled

Place dried shiitakes in a large bowl, cover with hot water.
Allow to rehydrate for 15-30 minutes.
Once mushrooms are softened, remove from liquid.
Remove stems and, if you have whole caps, cut into 1/4" thick slices.
Take liquid and pour through a fine mesh strainer to remove any debris and set aside.
In a medium saucepan combine vinegars, sugar, soy sauce and ginger.
Add in mushroom slices and 1c of the reserved cooking liquid.
Stir gently to combine.
Bring to a simmer over medium heat, then reduce and gently simmer for 30 minutes.
Allow mushrooms to cool in the cooking liquid then pack into a glass quart jar.
Add enough cooking liquid to cover.

Your pickles are ready to eat now (hooray!) but will also keep for
at least a month in the fridge.

Friday, November 23, 2012

Brown Sugar Whipped Sweet Potatoes

because Martha knows. MARTHA ALWAYS KNOWS.
Vegan Grand Marnier 
& 
Brown Sugar Whipped Sweet Potatoes.
Vegan brown sugar whipped sweet potatoes, plated up and ready to eat. 

All credit to Martha Stewart on this one. Though the recipe I use today only slightly resembles her original, she provided the framework. Her "Martha Stewart Living Cookbook" was a life raft for me during my early teenage vegetarian years. 


The original recipe includes a topping of caramelized apples and a more than healthy dose of dairy. The first years I followed the recipe verbatim, over time I phased out the dairy, toyed with the add-ins and eventually started making the dish sans caramelized apples. Today I make a simple sauce of coconut milk, brown sugar, vegan butter, and a splash of Grand Marnier (or other orange liquor)  to whip into the baked potatoes. Super easy, super quick, and undeniably delicious. These potatoes are not only a perfect thanksgiving side, an easy yet impressive dish to add to your repertoire, but great for the entire season.       
I encourage you to give the Martha recipe a try, but if you're looking for something a little simpler (and a little more vegan) mine is below.

You can find the original recipe here: 

Save your skins! They make a great snack.
 Vegan Whipped Brown Sugar Sweet Potatoes

4-6 large sweet potatoes
4 tbsp of vegan butter (such as Earth Balance)
3 tbsp vegan light brown sugar
1/3 cup of light coconut milk or other non-dairy milk
1/3c Grand Marnier (or other orange liquor)

Scrub sweet potatoes and pierce several times with a fork
Bake in a pre-heated 450 degree oven for approximately 40-45 minuted or until they can be pierced through with a knife
Allow potatoes to cool, then remove skins and place flesh in a bowl
Add a pinch of salt and mash with a fork

In a medium saucepan melt butter over medium heat
Add brown sugar, stir until dissolved
Whisk in milk and Grand Marnier,
Heat for 5 minutes or so, continuing to stir, until liquid is slightly thickened

Pour over mashed sweet potatoes and use a fork to incorporate liquid, stirring and mashing until potatoes are light and fluffy

Spoon potatoes into an oven safe dish

If you're making this for a thanksgiving of christmas dinner they can be prepared a day ahead of time, stored covered in the fridge, and baked to heat through. Another super easy holiday dish, how awesome is that?? Less time cooking, more time eating, isn't that what we all really want?

And don't toss those sweet potato skins! Sprinkle with a little sea salt and throw them back in the oven to crisp up a bit. They make an excellent (and easy) snack. 

Vegan Pear and Cranberry Crumble

eat it for breakfast, eat it for dessert, eat it all day long.
Vegan Pear and Cranberry Crumble.
Pears from the Egleston Winter Farmer's Market and local cranberries. 
When the first local cranberries start to appear, I get uncontrollably excited. Like jumping up and down and dancing for joy excited. Why? Because it means crumble season has arrived. And you guys, crumble season IS THE BEST SEASON. Tart cranberries offset by fragrant pears and baked to warm, gooey, crunchy perfection makes (winter) life worth living. Seriously. It was originally conceived as a dessert dish, but a couple of years ago the dangerous equation of 1 pre-baked thanksgiving morning crumble + 2 hungry and impatient people morphed it into a breakfast dish. So now it's a little of both.
A bit to start thanksgiving day, a bit to end it and a whole lotta carbs in between. 

Assembled crumble, ready to bake.

Breakfast is (sadly) often overlooked on big cooking holidays like thanksgiving and christmas. But breakfast is important, dammit, and cooking on an empty stomach sucks. Enter the crumble. It can easily be assembled the day or night before, stored in the fridge, and freshly baked in the morning. Or pre-assemble it to bake later in the day. One less thing to pull our hair out over about on thanksgiving or christmas morning? Yes please. And hey, be sure to stock up on cranberries while they're available. They freeze beautifully and can provide a much needed burst of color and taste in winter dishes. If pears are in short supply, apples work just fine, or you can do a mix of the two. 
Gorgeous local pears, soon to be crumble-d. 
Vegan Pear and Cranberry Crumble Recipe
(serves 8-10, or two if you're me and mine)

8 pears peeled and cut into roughly 1/2" pieces
3 cups fresh cranberries
3/4 cups white flour + 1/4 cup whole wheat flour, combined
2 1/4 cups rolled oats
3 tbsp lemon juice
1/2 cup light brown sugar
1 cup vegan sugar
1 cup vegan butter, chilled
1 tsp cinnamon 
1/2 tsp salt

If baking right away, preheat oven to 400 degrees.

To prepare the topping:
In a food processor, combine flour and butter and pulse until small crumbs form. 
Add 1/2 cup of the white sugar, brown sugar, oats, cinnamon and salt. 
Pulse until mixture forms into coarse crumbs. 
Set aside. 
If you do not have a food processor, no worries. 
Follow all the same steps, just cut the butter into cubes and get in there with your hands, working the ingredients until everything clumps together nicely. 

To prepare the filling:
Peel and cut pears into 1/2" pieces.
Combine pears, cranberries, other 1/2 cup of sugar, and lemon juice in a large bowl.
Toss to incorporate all ingredients.

Using about half of the crumble, gradually take the pieces and break them up in your hand, adding to filling.
Toss to combine, making sure things are more or less evenly distributed.

Transfer to an ungreased 9" x13" baking dish 
(or two 8" sq dishes, or a dozen or so ramekins)
Sprinkle remaining crumble over the filling 

Place on center rack in oven and bake for 34-40 minutes or until fruit has begun to 
bubble around edges and topping has reached a nice golden brown color.

If refrigerating unbaked, cover tightly with plastic wrap and store for 24 hours max. 
Take baking dish out of the fridge and allow to reach room temp before baking.
Baked and ready for eatin'.
Keeps for up to a week in the fridge, though (trust me)
there's no way it will last that long. 

Enjoy!

Wednesday, November 14, 2012

Creamy Polenta with Tempeh "Bacon" and Greens

Favorite Winter Breakfast: Creamy Polenta with 
Tempeh "Bacon" and Sauteed Greens.
Beautiful home-grown bright lights chard.
 New England winters can be pretty harsh. Sometimes, in the endless dark and cold,  faith waivers a bit and even the most seasoned of New Englanders can begin to question whether spring will ever roll around again. We learn to grow what will survive in these dark times- hearty, healthy, relatively indestrucable things. 


Chard is one of those things. It can survive frigid temps, actually tastes better after a frost, and grows very well in containers- perfect for us city folk. It may seem like a small thing, but being able to walk out on to your porch and grab a handful of fresh greens makes the long hard winter seem just a bit more bearable. I'm a big proponent of greens for breakfast year-round, but there is something particular soul-nourishing about greens in the winter. If you don't grow them yourselves greens like chard, arugula, and kale are available from your local farmers through the winter months.


Now doesn't that look delicious?

After years of tinkering, this particular combination has become one of my no-fail breakfasts. Its warm, nourishing, perfectly savory, relatively inexpensive to prepare, and incorporates staples I always have on hand- like polenta and tempeh- with whatever greens are available. 


I always have polenta in the pantry- its inexpensive and quite versatile. As for brands, I can not recommend Bob's Red Mill highly enough. I've tried many other brands over the years and theirs is superior in every way- perfect texture, no clumping, and well priced. I like to add about 1/4 cup more water than the recipe calls for to ensure the polenta remains creamy, rather than setting up. I also add a tablespoon or so of non-dairy butter. Earth Balance is my go-to.

Recipe

Creamy Polenta, Tempeh "Bacon" and Sauteed Seasonal Greens

1 cup of Bob's Red Mill Polenta
3 1/4 cups + a splash of water
1 Tbsp Earth Balance
pinch of salt
1 package of whole grain (unseasoned) tempeh
cut into 1/4" strips
1 Tbsp + a splash of tamari or soy sauce
1-2 Tbsp olive oil
approx. 1/2 cup apple cider vinegar (use the cheap kind)
One bunch of greens (chard, kale, arugula) washed and chopped
1 Tbsp maple syrup (optional)

Preparing the polenta:In a medium saucepan with lid bring the 3 1/4 cups of water, pinch of salt, and 1 Tbsp butter to a boil.
Slowly pour in 1 cup of polenta while gently stirring to prevent clumping, 
reduce heat to medium-low.
Place pot lid loosely on, just enough to prevent splatter.
The polenta will cook in 15-20 minutes, stir every few minutes.

While the polenta cooks: 

Heat 1 Tbsp of olive oil, 1 Tbsp of tamari and the apple cider vinegar in a large saute pan over med. heat.
Lay tempeh strips in the pan, making sure they are submerged in the liquid.
Cook for about 6 minutes on each side. 
Once the liquid reduces the tempeh will begin to brown and crisp up.
You can brown it as much or as little as you want from this point forward.
I prefer mine quite browned and crispy, 
sometimes I even add a bit more olive oil to the pan and fry it longer.

Once the tempeh is cooked:

Remove pan from the heat, take tempeh out and place on plate.
Deglaze the saute pan with a splash of apple cider vinegar.
Add a splash of tamari, and a drizzle of olive oil.
Return pan to medium heat and add your chopped greens, drizzle a small amount of water over the top and stir. 
At this point you can place the top on the pan to give them a bit of a steam, or you can cook uncovered.
I generally only cook mine for a minute or two, covering very briefly, 
keeping them nicely crisp and bright.

Once the greens are cooked:

Place a scoop of polenta in a bowl.
Crumble some of your tempeh "bacon" over the top, spoon in some greens and 
drizzle with a bit of the remaining cooking liquid.

If you're feeling especially decadent you can add a bit more Earth Balance and even drizzle a little maple syrup over the top. 

I won't hesitate to highly recommend doing both.

Tuesday, November 13, 2012

Pickled Turnips

Middle Eastern Staple: Pickled Turnips
Beautiful local red turnips from the Egleston Winter Farmers Market.
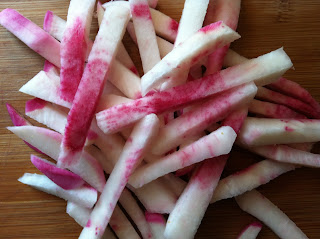
Red turnips, scrubbed and ready for peeling and pickling.
In my almost two decades as a vegetarian I've conquered nearly all socially stigmatized vegetables- brussel sprouts, spinach, cabbage, and even the dreaded lima bean- but turnips have always been a bit of a mystery. I've tried a handful of turnip preparations over the years- turnip fries, turnip mash, roasted turnips- nothing has ever quite satisfied. That is, until I discovered that most magical of Middle Eastern accompaniments, pickled turnips. I am of the firm opinion that  any dish tastes better with a pickle, and pickled turnips are no exception
to this rule.


Crunchy, tart, and earthy- they add a deeper flavor profile to any Middle Eastern dish,  go perfectly with hummus,  and are a snap to make.They are traditionally prepared with white turnips, and get their pinkish hue from a couple slices of beet added to the jar during prep.

 I discovered these red turnips at the Egleston Winter Farmer's market this weekend and decided to give them a try instead. I believe the taste and texture will be the same,  and they are already a bit pink, which is a nice bonus. For this recipe I used a fairly traditional brine and added fresh garlic and bay to the jar.

Recipe:
Middle Eastern Pickled Turnips (Turshi Left)

Approximately 2lbs of turnips- scrubbed, peeled, and cut into matchsticks
1 small beet- scrubbed, peeled and similarly sliced
2-3 cloves of garlic- sliced thinly

2 1/2 cups of white vinegar
1 1/4 cups of water
1/3 cup kosher salt

bay leaf (optional)


Place garlic slices, bay leaf, sliced turnips and beets into a clean, sterilized 2 quart jar.
Combine water, vinegar, and salt in medium saucepan and bring to a boil, stirring until salt is dissolved.
Pour hot brine into over turnips and allow to cool to room temperature.
Once jar is cooled, cover and find a cool dark place to store for one week to allow the pickles to properly cure and the flavors to blend.
The pickles will look very light pink at first, but the beet slices will darken their color over the week.
Once the week is up, the pickles can be stored in the refrigerator for up to six weeks, though I doubt they'll stay uneaten for that long.

Enjoy on their own as a quick snack, as part of a mezze plate, or wrapped up in a Middle Eastern sandwich- they are an outstanding addition to hummus and compliment stuffed grape leaves beautifully as well.