Saturday, December 22, 2012

Vegan Chocolate Chip Cookies

(kinda) just like mom used to make:
Classic (Vegan) Chocolate Chip Cookies
The perfect (vegan) chocolate chip cookie.
Good vegan chocolate chip cookies do exist, that's all you need to know.
This is my vegan spin on the classic Toll House cookie recipe, found here:
Nestle Classic Chocolate Chip Cookies .
I've played around with a few of the proportions, but the framework is Nestle's. 
 In place of eggs, a flax egg (the best egg substitute for vegan cookie baking). In place of butter, a vegan margarine. Add some non-dairy chocolate chips (not too hard to come by these days), a little baking powder, sugar, brown sugar, salt, flour and there you have it: Vegan chocolate chip cookies! Throw some raw walnuts into the mix and you could almost say they're good for you, right?? I say yes. 

So here we go:
Classic (Vegan) Chocolate Chip Cookies:
Makes approximately 3 dozen

You will need a stand mixer or a very strong mixing hand/shoulder for this recipe.

2 1/4c all purpose flour
1 1/2 tsp baking soda
1tsp salt
3/4 cup organic sugar
3/4 cup organic 
brown sugar
1 1/2 tsp vanilla extract
2.5tbsp ground flax seeds
6tbsp boiling water
2 cups non-dairy 
chocolate chips
1c vegan butter
1 1/4c raw walnut pieces 


To prepare your flax egg:
Combine ground flax seed and just boiled water in a bowl, whisk to combine.
Let sit for 5 minutes, mixture should become gelatinous and somewhat-egg like.
If it still looks watery, pop in the microwave for 10-15 seconds to thicken up. 
Set aside until needed. 

To prepare your cookie dough:
In a medium sized bowl combine flour, baking soda and salt.
Whisk to combine; set aside.
Combine vegan margarine and both sugars in the bowl of your stand mixer.
Mix at medium speed until creamy.
Add in vanilla extract and flax egg, continuing to mix until well incorporated. 
Scrape down the sides of your mixing bowl as needed.
Reduce the speed of your mixer to low and add in flour mixture, 1/2 cup at a time.
Mix until all ingredients are combined.
Remove bowl from mixer stand and fold in chocolate chips and walnuts. 
Chill your dough in the refrigerator for 15-20 minutes.

Preheat oven to 375 degrees.
Either grease your cookie sheets or line them with silpats.
Drop by well rounded teaspoon onto sheets,
ever so slightly flatten the tops and bake for 12-14 minutes.
Do not over bake.
Remove the cookies from the oven when they still look slightly underdone
and allow to sit on cookie sheets for a full minute before removing.
This will make for a nice soft yet sturdy chocolate chip cookie.

Allow to cool, if you can resist!
Post cookie-making still life. 

Friday, December 21, 2012

Vegan Blueberry Muffins

good and good for ya:
Vegan Wild Blueberry Muffins
Vegan wild blueberry muffins fresh from the oven.
There are few better ways to start your morning than with a fresh blueberry muffin. However, trying to find a good vegan muffin can be more than challenging. They are often either too tooth-breakingly dry or too tooth-achingly sweet, and forget about healthy. Before they turned into the monstrous, cake-y, chemical filled calorie bombs they are today, muffins were supposed to be a smart healthy breakfast, right?? Well this recipe is just that, low in sugar, packed with blueberries and completely non dairy. They bake beautifully and, when cooled, have that perfect cake-like muffin top we all crave. I prefer to use wild blueberries, I stock up on fresh ones in Maine over the summer and freeze them up for future use. You can find them fairly easily in grocery stores, along with other frozen fruits, but regular blueberries will work just as well.


Perfect Vegan Maine Wild Blueberry Muffins
makes 10-12 muffins

Pre heat your oven to 375 degrees and thoroughly grease your muffin tin.

Vegan muffin batter, ready for blueberries.
Ingredients:
1 1/2c all purpose flour
1/2c whole wheat flour
2 tsp baking soda
1/2tsp salt
1/2c vegan sugar
1c non dairy milk 
(I use hempmilk)
1/3 cup of a neutral oil (canola, grapeseed)
2 tsp vanilla extract
2 tsp apple cider vinegar
2c fresh or frozen blueberries (I use frozen wild blueberries)

Combine flours, baking soda, salt, sugar and stir to combine.
Add milk, oil, extracts and vinegar.
Stir until all ingredients are well combined.
Add in your frozen blueberries and gently fold to incorporate.

Fill your well greased muffin tins 2/3 full.
Greased muffin tins, filled and ready for the oven.
Bake for 20-25 minutes, or until tester inserted into the center comes out clean.

Let use a dull knife to gently loosen any stuck parts from the muffin tins 
and turn out muffins onto a cooling rack.

Fresh from the oven and cooling down.

Allow to cool for a bit before eating.

These will keep very well in an airtight container for a couple of days
or for up to a week in the fridge.
Don't forget to share. 


Wednesday, December 19, 2012

Vegan Peppermint Patties

food gifts are the best gifts.
DIY Dark Chocolate Peppermint Patties.
Processed peppermint patty filling, ready to be formed.


Ok, I'm not gonna sugar-coat it (badum bum), these might get you in a little trouble. You may find yourself lying on the couch, face and hands covered in chocolate, cursing the day you first decided that they would make fantastic and (theoretically) easy Christmas gifts. Or, if you're more responsible and more time-management focused than I, you may just have a delightfully relaxing day putting these treats together. Learn from my mistakes, kiddos. Don't try to prep, dip, individually wrap and box up two hundred and fifteen of these in one day. My hands might be permanently claw-shaped from so much teeny tiny wrapping. But still, worth it. These mints are GOOD, (relatively) easy to prepare, and are sure to make you the king/ queen of holiday food gifts. 
They're such a hit with my friends and family 
that people start asking me about next year's batch right around January first. 
But, as much as they may beg, I make them but once a year.
First rule of show business (or peppermint patty making), 
gotta keep 'em wanting more. 

Now, this recipe is for a large batch. If you make small patties (about teaspoon sized) it will make between 60-70. You can easily halve the recipe, but I encourage you to make the full batch. You'll already be putting in the work, so why not make more? You can vary the size of the patties a bit, though if you go too big they can become a bit unwieldy. I like to make mine small, about 1/2" across;
 I find the filling holds together perfectly at this size. 
These keep super well in the fridge and also freeze beautifully. 

Formed and frozen peppermint patty filling, ready to be dipped.
 So here we go:
Vegan Dark Chocolate Peppermint Patties
( makes approximately 60-70 small patties)
First batch of finished mints, only 200 more to go.


You will need a food processor and a double boiler
set-up on your stove top for this recipe.

Ingredients:
6c organic powdered sugar
1/4 cup coconut oil, melted
2Tbsp room temperature coconut oil
2tbsp peppermint extract
2tsp vanilla extract
1/4 cup light (unsweetened) coconut milk
4 cups (2 12oz bags) vegan dark chocolate chips


What a mess.


To prepare the filling:
Combine sugar, 1/4c coconut oil, coconut milk and extracts in the food processor.
Mix until ingredients have combined to form a well incorporated paste.
The mixture should look like the photo above.
Scrape filling out of food processor and into a medium sized bowl.
Cover with plastic wrap and let chill in the refrigerator for 30 minutes. 

Once the filling is chilled:
Remove from fridge and line two large cookie sheets with parchment paper or silpats.
Measure out a teaspoon sized ball of filling and roll into a ball in your hands. 
Place the ball on mat and gently flatten with two fingers.
Repeat until you have filled your cookie sheets. 
Place filled cookie sheets in the freezer for 20-30 minutes.
If you find that the filling is becoming sticky and hard to work with,
place it back in the fridge for 10-15 minutes. 

When your filling is nearly chilled, set up a double boiler on your stove top.
Bring water to a slight simmer over medium high heat.
Add chocolate chips and 2Tbsp coconut oil, stirring until melted.
Remove frozen fillings from the freezer and loosen them from the trays.
They should be solidly frozen enough to easily pop off.

Dipping your mints:
Dip a dinner fork into the melted chocolate to coat the tines.
Place a frozen filling disc on top of the coated fork.
Dip completely into the melted chocolate, coating the disc.
Allow the excess chocolate to drip off, then drag the fork
over the edge of the bowl, removing the rest of the chocolate.

Use another fork or knife to gently slide your coated mint off of
the dipping fork and back onto the silpat.
Repeat this process with all mint fillings,
then return dipped mints to the freezer to set up.
If you find that your un-dipped fillings are becoming too soft to work with,
return them to the freezer to re-freeze.

Once your dipped mints have set up (10-15 minutes in the freezer)
remove them from the silpats and package however you'd like.
I find that, if giving them as gifts, individually wrapping them makes for both
neater storage and better presentation.
Just pick up some baker's paper or parchment and cut it to the appropriate size.
Because there is no dairy these can be stored at room temperature,
but also keep very well in the fridge or freezer.

Now go make some and impress all your friends!

This is the best part.
My hand should uncramp any day now...


Friday, December 14, 2012

Vegan Chana Dal

Vegan Indian Food:
Homemade Chana Dal
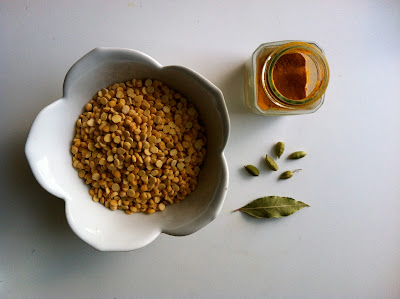
Chana dal (split chickpeas), turmeric, cardamom pods and bay leaf. 

Well-stocked pantry staple: Chana Dal. 
There is no beating around the bush on this one, I L-O-V-E Indian food. Just one problem with this little love affair, I'm a chronic over order-er. Trying to decide on just 1 (or 2) dishes can send me into near hysterics. Shockingly, this is not a wallet friendly way to dine out. Well as we all know, admitting you have a problem is the first step. And, in the world of thrifty vegan home cooking, learning to make it your damn self is the second. After a fair amount of practice I've mastered dosas, have a pretty good handle on chana masala and can throw together a pretty bad ass curry without much effort. On to the Chana Dal, which is suprisingly simple and quick to prepare.


Once your pantry is stocked with the right staples (rices, grains, and of course spices), and you've familiarized yourself with the proper spice combinations, churning out an Indian dish or two really doesn't seem all that scary. While Chana dal look very similar to yellow split peas, they are actually the interior kernels of  skinless black chickpeas, which have been split in two. You should be able to find it in an Indian specialty store, in the bulk section of your local health food store,
 or if all else fails, online. 

This recipe is prepared in the traditional way, dal simmered in water with spices then blended and a tadka or chanuk (fried garnish) added to the finished dish. 

You will need an immersion blender (ideally), a standard blender
or a potato masher for this recipe. 

Turmeric, cardamom pods and bay leaf. 
Vegan Chana Dal Recipe:
1c dried chana dal
4c water
2tbsp olive oil 
2 tsp turmeric
1 bay leaf
1/4 tsp ground cardamom
1tsp ground cloves
1tsp red chili flakes
1tsp salt
3 garlic cloves, finely minced
1tbsp minced cilantro (optional)

Combine dal, turmeric, bay leaf, salt and cardamom in a large saucepan.
Cover with 4c water and bring to a boil.
Reduce heat and gently simmer, covered, for 35-40 minutes.
There should be some liquid remaining in the pot once the cooking time is up.
Remove the bay leaf. 
Chana dal, finished cooking, before being blended.  
Using an immersion blender, puree about 1/2- 3/4 of the chana,
leaving the remaining in tact.
This will give you a mostly creamy dish that still has a bit of texture.
If you do not have a blender, use a potato masher to mash about half to 3/4 of the chana, creating a mostly creamy consistency but leaving some whole chana in the mix.

Preparing the tadka:
heat the 2tbsp of oil in a medium saucepan over medium high heat. 
Add your minced garlic, stir for 1-2 minutes or until garlic begins to brown and sizzle. 
Add in ground cloves and chili flakes and cook for 30 seconds more, stirring frequently. 

Pour the finished tadka over top of the dal, stirring to combine.

Pairs well with brown or white basmati rice.
Garnish of cilantro, optional but nice for a pop of flavor (and color). 
Finished dish over a bed of brown basmati rice. 

Thursday, December 13, 2012

Vegan Curry Rice Noodles


spicy coco-nutty deliciousness:
Thai Red Curry Coconut Rice Noodles

Medium vermicelli rice stick.
Thai basil, lime and red curry paste.

I'm not going to pretend to have made my own red curry paste here or anything. That's a culinary line I have yet to cross. Soon, but not yet. What I am going to do is tell you that I've found a brand of fantastic Thai curry pastes that DO NOT CONTAIN SHRIMP PASTE. If you're vegetarian or vegan and have ever shopped for curry paste you'll understand what a big deal this is. The brand is MaeSri; they make a variety of Thai curry pastes, including Red, Green and Massaman, all of which are vegan friendly. The cans are small at 4oz, but a little bit goes a very long way; this recipe only calls for 1tbsp. 
Simply keep the remaining paste refrigerated in a sealed glass jar for future use: it will keep for at least 6 months. The Red curry paste, my favorite, contains only chili, garlic, shallots, salt, sugar, lemongrass, kaffir lime and spices. It seems to be a fairly popular brand, I've seen it in a number of Asian groceries in my area. If you're lucky enough to have an Asian grocery close by you'll want to hit it up for this recipe. Trust me when I say it will be your best and cheapest option for ingredients like rice stick, ginger root, sesame oil, limes, coconut milk, Thai basil and of course curry paste.  
If you're unable to find this brand locally, you can purchase it online here: 

This recipe makes a rich and flavorful coconut based curry; the rice noodles are the delivery system. I like mine topped with a healthy handful of Thai basil and a wedge of lime. I enjoy this as a straight-up noodle dish, but occasionally add in whatever vegetables are on hand. If you do decide to add veggies make sure they are cut small enough to cook quickly and mix easily into the curry and noodles.
MaeSri Red Curry Paste. 

Vegan Thai Red Curry Coconut Rice Noodles:
serves 4

You will need:
1tbsp sesame oil or canola oil
1 tsp freshly grated ginger root
1/2 yellow onion, diced
1 small garlic clove, finely minced
1 lime, half juiced and half reserved for garnish
1 tbsp red curry paste
1 15oz can unsweetened light coconut milk 
(You can use full fat instead, I just prefer the light)
1lb rice stick noodles, I recommend medium to thick rice stick.

1 - 1 1/2 cup of vegetables such as thinly sliced carrots, broccoli or cabbage (optional)
Thai basil for garnish (optional)

Red curry rice noodles topped with Thai basil and a lime wedge. 

Bring a medium pot of water to a boil and cook rice noodles according to instructions.
*Drain and set aside when finished, keeping covered so noodles do not clump and stick.

If adding vegetables to your curry have them washed cut and ready to go.

In a large saute pan heat the sesame oil over medium heat. 
Add diced onion, cook for 2-3 minutes , stirring frequently, 
until they begin to become translucent.
Add minced garlic and ginger, stir, cooking for 1-2 minutes more. 
Add curry paste, stirring to combine, and cook for one minute more. 
Add in coconut milk, using a whisk to incorporate all ingredients.
optional: Add vegetables to coconut milk mixture and cook for 5 minutes more.
Turn off heat.
Add lime juice.
Add cooked noodles to your pan, tossing until all ingredients are combined 
and noodles are well coated.
Serve with Thai basil and a lime wedge.

Tuesday, December 11, 2012

Vegan PBR Beer Bread

stop pulling your hair out!
Too Easy: Vegan PBR Beer Bread
Beer bread, out of the oven, drenched in butter and ready to impress. 
Party season is upon us. We all like the holidays but let's be honest, sometimes they can be a giant pain in the ass. Between work and life, scrambling to come up with something to bring to holiday dinner parties can be enough to make you pull your hair out. Never fear, beer bread is here! This recipe is perfect for just such ocassions, its a no-knead to the nth degree and almost embarrassingly easy. Its also pretty perfect for an I'm-just-gonna-sit-on-my-couch-and-eat-bread-all-day kind of day. It can be thrown together almost literally at the last minute and pairs well with a variety of things. I've eaten it for breakfast with Earth Balance and jam and for lunch/dinner/appetizers with butter, hummus, or whatever else is around. If you're looking for a SUPER easy food gift for Christmas, this is it. Just combing all of the dry ingredients in a mason jar, write out a pretty recipe card with instructions, include a bottle of beer (or not), tie a bow around the whole thing and voila! 
(Almost) instant Christmas gift! 

Beer bread batter, fully mixed. 

You will need: 
1 standard sized loaf pan, thoroughly buttered. 
2 1/2c all purpose flour + 1/2c whole wheat flour
1 1/2tsp baking soda
1/2tsp baking powder
1tbsp vegan sugar
1 1/2tsp ground sea salt
5tbsp Earth Balance
1 12oz beer of your choosing, 
I used a PBR for the bread in the photos.

Preheat oven to 400 degrees.
Thoroughly grease your loaf pan with 1tbsp of the Earth Balance.
In a medium mixing bowl combine all dry ingredients, stir. 
Pour in beer slowly, dry ingredients will fizz up quite a bit.
Stir slowly until well combined.
Dough will be very wet and sticky.
Pour your dough into greased loaf pan and shake to distribute evenly.

Beer bread batter in prepared loaf pan, ready to bake. 

Bake at 400 degrees for 15 minutes.
Lower temp to 375 and bake for 30 more minutes or until top is golden brown.
Place loaf pan on a cooling rack.
Melt remaining Earth Balance and pour over top of your finished loaf. 
Let sit for 5-10 minutes then turn out onto a work surface. 
You can eat it right away (it'll be hard not to) or allow to cool, wrap tightly in foil, 
and re-heat when you're ready to party.

Freshly baked beer bread waiting for its butter bath.

Monday, December 10, 2012

Vegan Yeasted Waffles

perfect every time:
Vegan Crispy Yeasted Waffles
Out of the waffle maker and ready to eat. 
Sometimes a simple pancake just won' t do. Sometimes I need my weekend breakfast to feel a little more polished, a little fancier if you will. This is my go to recipe on those days. Its an easy one, but it is sure to impress the hell out of you and anyone lucky enough to be part of your waffle party.
It still manages to impresses me every time I make it.

This is a yeasted batter, creating a waffle that is both incredibly light and at the same time crispy on the outside.  I use a mix of all purpose and whole wheat flours, adding flax which provides a slight nutty flavor. The best thing about these waffles? In addition to tasting amazing, they're pretty damn good for you. This batter can be made the night before and left covered to rise overnight, or can be made the morning of and placed in a warmed oven to rise for 60-90 minutes. If you're a planner, go for the night before. If you're a throwing-it-together-at-the-last-minute kind of cook (like me), the warm oven trick is for you. Each variation is quite easy, it all just comes down to scheduling; they come out perfectly either way.

A little tip: when preparing the waffles, keep your oven or toaster oven on the warm setting and place the finished waffles directly on the grate, in a single layer.
This will keep them crisp until you're ready to eat.

Crispy yeasted waffles with flax seeds.

Vegan Crispy Yeasted Waffles Recipe.
makes 8-10 waffles

1/2c warm water
2c non dairy milk (warmed)
3tsp active dry yeast
1/2tsp ground sea salt
1 1/2tsp organic vegan sugar
1 1/2c all purpose flour
1/2c whole wheat flour
1/2c melted vegan butter


Add to finished batter:
2 flax eggs (2tbsp ground flax seed mixed with 6tbsp hot water)
1tbsp of whole unground flax seeds

Pour the 1/2c of warm water into a medium or large mixing bowl.
Your batter will approximately double in volume during the fermentation process,
so make sure your bowl is big enough. 
Sprinkle the yeast over the surface of the water and
allow to sit for 10 minutes until slightly frothy.
While the yeast proofs, heat 2c of non-dairy milk, on stovetop or in the microwave. 
Melt 1/2c vegan butter.
Once yeast is proofed add milk and melted butter, whisk until combined.
Add in flours, sugar and salt, whisk until you see no lumps.

If letting sit overnight: 
Cover your bowl tightly with plastic wrap or a well fitting lid and
place in a warm, dry area.
Allow to rise for 8 hours.
Batter will increase in volume and appear bubbly when ready.

If preparing the day of:
*If using this method, make sure not to use plastic wrap to cover your bowl;
you don't want it heating in the oven.
Use either a tight fitting lid or aluminum foil with a heavy plate on top.

Pre heat your oven to 275 degrees and allow to warm for 5-8 minutes.
Turn off the oven, place your waffle batter on the middle shelf
Cover your bowl with a tight fitting lid and place inside the warmed oven.
Allow to rise for an hour to hour and a half, or until batter has increased in volume and appears bubbly.

Crispy golden deliciousness.

Once your batter is ready:
Prepare flax eggs by combining 2tbsp of ground flax seeds
with 6tbsp of freshly boiled water.
Whisk to combine and allow to sit for 5 minutes or until thickened and gelatinous.

Add flax egg mixture, whole flax seeds to batter.
Whisk to thoroughly combine.

Pre heat your waffle maker.
For my particular model, a single circular waffle maker,
a half cup of batter makes one waffle.
This recipe will make 8-10 waffles.
Measure out appropriate amount of batter for your waffle maker.

Once waffles are ready place single layered in a warm oven until ready to serve.

Top off with a little  butter and maple syrup and you're ready to go.

Also perfect for vegan chicken and waffles.
C'mon, you know you wanna.
Just add a few Gardein crispy chicken tenders and drizzle with maple syrup.
Done!

Vegan chicken and waffles? Yes, I believe I will.

Thursday, December 6, 2012

Homemade Ginger Ale

you decide:
Yeasted Ginger Ale
or 
Yeasted Ginger Beer
Fermented ginger ale, with ice and a fancy straw, ready to drink.
 Ugh, high fructose corn syrup, why are you in EVERYTHING?? I get the processed foods; I wouldn't touch that garbage with a 10 foot pole, but in tonic water and ginger ale? Come on. I like a good stiff drink; I also like a well mixed cocktail. I do not however like that cocktail with a side of corn poison. The organic ginger ales from the local co op are delicious, but way too expensive. What to do? Homemade of course! There was a bit of trial and error before settling on this recipe. An exploding plastic bottle or two, one bottle of flat-as-all-get-out ginger "juice", and one bottle filled with a weirdly syrup-y, congealed mess. But all of the sticky disasters were worth it because THIS recipe produces one outstanding drink. Its fizzy and fresh and actually very little work to put together. The final result is something of a cross between ginger beer and ginger ale. It is fermented like a ginger beer, but has the light, fresh taste of a ginger ale. Best of both worlds!
Freshly squeezed lemon juice, ready for ginger ale makin'.

You decide what to call it...
Yeasted Ginger Ale
or 
Yeasted Ginger Beer
or
Yeasted Ginger Beer-ale
or 
Yeasted Ginger Ale-beer:

You will need a
clean 2L plastic bottle or jug with tightly fitting cap.

Plus:
1c organic vegan sugar
2 1/2tbsp peeled and freshly grated ginger root
1/4tsp active dry yeast
2tbsp freshly squeezed lemon juice 
7.5-8c of cold filtered water

Clockwise from top left: Organic sugar, lemon juice, pre-grated ginger, yeast. 
Using a funnel or spouted measuring cup pour sugar, yeast, lemon juice, and grated ginger root into plastic bottle.
Pour approximately half of the filtered water into bottle, cap and shake vigorously to combine.
Remove cap and add the rest of the water, leaving about 1" of headspace.

Recap and shake again.
Place capped bottle in a warm, dark place to ferment for 48 hours,
then transfer to the refrigerator.
About halfway through the fermentation you should unscrew the cap,
to release some of the carbonation, then re tighten it. 
Leave in the fridge for 12 hours, this will stop the fermentation process.

Fermented ginger ale, getting fizzy in the morning sun.

Your ginger beer is now carbonated and ready to drink!
At this point it can be strained,
or you can drink it as is.
I leave mine un-strained.
Nothing wrong with a
little minced ginger in your drink, right?
Leaving the ginger in makes the drink feel fresher and more alive. I think thats a pretty good thing.


My favorite new cocktail:
Gorgeous!
I'm calling it the Royal Ginger Fizz, at least for now...

Combine:
2 shots of yeasted ginger ale
1 shot of Crown Royal Black
topped with a few pickled cranberries,
My recipe here: SlowClubCookery's Spiced Bourbon Pickled Cranberries

Drink it down.
Repeat as necessary.

Wednesday, December 5, 2012

Vegan Fresh Pasta Dough

Finally:
A Vegan Fresh Pasta Dough Recipe.
Freshly cut vegan pasta dough, out of the pasta maker and ready to boil.
There is something special about fresh pasta. It scratches a certain kind of itch that dried pasta just can't reach. When you're eating vegan, fresh pasta and its traditional egg-y goodness is pretty much off the table. Before getting a pasta maker I'd made more than a few attempts at hand cut pasta. The dough never quite came together right, always too stiff or too soft, leaving my fresh pasta craving unsatisfied.  Finally, after years of trial and error (and frustration), this recipe was born. I've used it both with and without a pasta maker. While the pasta maker certainly makes the rolling and cutting process easier, this dough is workable enough where it can be rolled and cut by hand. The key to this dough is flour, flour, flour, and more flour. Did I mention flour?  Make sure your dough is very well floured when rolling out and especially when cutting, the more the better, to prevent sticking. I like to have a shallow aluminum baking pan with a layer of flour in it at my disposal when rolling our the dough. This way I'm not making a horrendous mess flinging flour everywhere but can easily get some on my dough when needed. 

Double recipe of fresh pasta dough, resting.
Prepping the dough requires either
a strong stand mixer or  a strong shoulder and a bit of elbow grease, as the dough should be kneaded for a solid 10 minutes. The final result is a dough that is light and holds its shape perfectly. A pinch of turmeric added to the flour mix gives the it an egg-y appearance, minus the actual egg.  I like to make my pasta with straight up all purpose flour. Its inexpensive and I always have it on hand. When I'm lucky enough to have semolina flour in the pantry I use one cup in place of 1 cup of the all purpose. The texture of the dough with the addition of the semolina flour is slightly heartier, though the all purpose only dough is pretty outstanding on its own.

A quick piece of advice: don't spend a ton of money on your pasta maker! We have a relatively inexpensive model and it gets the job done more than adequately. Granted, it doesn't extrude perfectly formed play dough fun factory shapes like the KitchenAid attachment, but it makes great linguine and spaghetti.


Without further ado:
"Finally" Fresh Vegan Pasta Dough Recipe:

2 3/4c all purpose flour (more as needed)
3/4c water (more as needed)
1/4 tsp turmeric
1/2 tsp sea salt
1 tsp olive oil

If mixing by hand:
Combine dry ingredients in a medium sized mixing bowl.
Create a well in the center, add water and olive oil.
Stir with a wooden spoon until well combined.
Using your hands, knead the dough in the bowl until all of the ingredients bind together and it forms into a ball.


The dough should not be sticky, and should also not be so dry it doesn't hold together.
If you find the dough to be too dry at this point you can add a bit more water.
Do this VERY gradually, no more than a 1/4 tsp at a time,
until the dough is more workable.
Conversely, if you find the dough to be too moist and sticky, add a pinch of flour at a time, until dough is a workable consistency.
Turn dough out onto a lightly floured work surface and knead, with floured hands,
for 10 minutes until dough is smooth.
If you find dough too sticky, sprinkle in flour as needed.
Once kneaded, form dough into a ball and lightly flour the surface.
Allow dough to rest, covered with plastic wrap or a clean towel, for 10-20 minutes.

If using a stand mixer:
Place dry ingredients in the mixing bowl of a stand mixer with dough hook attached.
Add water and olive oil.
Mix on medium speed until dough begins to form a ball.
Stopping mixer from time to time to scrape down any dough stuck on the hook or sides of the bowl.
If dough seems too dry, add a couple of drops of water at a time.
If dough is too wet, add a pinch of flour at a time until it becomes more workable.
Dough should not be sticky and should become smooth and workable after 6-8 minutes in the mixer.
Once dough comes together, remove from bowl and form into a ball.
Follow above directions for resting the dough.


Your dough can also be stored for a couple of days in the fridge before cutting. 
Just allow the dough to rest, then wrap tightly in plastic wrap and refrigerate. 


After dough has rested:
On a floured work surface, use a sharp floured knife or a pastry cutter to divide your dough ball into 5 or 6 equal parts.
Roughly form these cut pieces into discs, generously flouring each side.

Fresh pasta dough, cut and ready to be floured and formed into discs. 
If cutting by hand:
On a floured work surface, roll dough disc as flatly as possible, constantly flipping and
making sure each side is very well floured.
Roll from the center out, then flip and do the same for the other side, rolling your
piece of dough into a long and narrow shape, rather than a round shape.
Try to get your dough down to between 1/8" and 1/16"  thick, if possible.
Thoroughly flour each side, then roll dough up and make cuts along roll to your desired width.
Unroll noodles and place on drying rack or on well
floured baking pan before cooking.
Repeat with each dough disc.

If using a pasta maker:
Pass your well floured dough disc through the roller part of your pasta maker,
first of the thickest setting, then going down 1-2 notches at a time
to your desired thickness.
My pasta maker goes from 7 down to .
I start on 7, pass the dough through twice, then go down 1 notch at a time
to the 3 setting.
Add more flour in between rolling if needed.
Once dough is rolled to desired thickness you are ready to cut the pasta.
Thoroughly re-flour both sides of the sheet.
Roll dough sheet through the cutting mechanism of your pasta maker.

Place cut pasta on a drying rack or on a cookie sheet that has been floured so noodles do not stick together.

You can dry this pasta on racks for 10-15 minutes and store
 in the fridge for a few days.

But who wants to wait??

Boil for approximately 3 minutes, or until pasta begins to float to the surface.
Drain and eat eat eat!!

Tuesday, December 4, 2012

Preserved Meyer Lemons

Making Up For Lost Time:
Preserved Meyer Lemons
and
Smokey Preserved Meyer Lemon Dressing

Meyer lemons, washed, scrubbed and ready for preserving.
Oh preserved lemons, where have you been all my life? I'd heard whispers of your existence, seen references to you in cookbooks and glossy food magazines, but never did I think it would be so easy to make you for myself . Yet here you are, after very little work on my part, in my fridge, waiting for me to add you into dishes and dressings whenever my little heart desires. You're the most glorious pickled food I've ever eaten. If only I had known sooner,
we could have had so much more time together .
*sigh*
Oh well, ever forward.

While most preserved lemon recipes call for traditional lemons, I decided to use the gorgeous Meyer lemons found at the grocery store this weekend. They're a bit pricier and a bit harder to come by, but every bit worth it. Meyers are almost indescribably wonderful. A cross between a traditional lemon and a mandarin orange, they have a sweeter nearly floral taste and are more vibrantly colored with a thinner skin than regular lemons. If you see them, stock up; they are only in season for a brief window, usually from December through April. I tend to hoard them whenever they're available, freezing the juice, candying the peels, drying the zest,
and of course, making preserved lemons.

Now you can add herbs to your lemons; a bay leaf, cinnamon stick, coriander, etc.,
or choose to leave your lemons relatively naked, adding only salt.
I go the naked route, having found that adding spices can muddle the
complex flavor of the lemon itself.

So here it is, my 
Making-Up-For-Lost-Time
Preserved Meyer Lemons Recipe
Meyer lemons, quartered with ends attached, topped with kosher salt.

You will need:
Sterilized 1qt jar with tightly fitting lid
8 -10 meyer lemons
1/2- 3/4c coarse kosher salt

Thoroughly wash your lemons then slice off each blossom end .
Cut each lemon into quarters, leaving attached at the base.


Open each lemon and sprinkle about 1 tbsp of salt over both the inside and skins.
Line the bottom of your jar with 1/4' of kosher salt .
Pack the salted lemons into the jar, squishing them down with your hand
until the juice rises up enough to cover them.
Jarred salted meyers, ready to top with lemon juice.
If there is not enough juice to cover add some extra.
Sprinkle a Tbsp of salt over the top and tightly seal the jar.
Leave out at room temperature for 2-3 days.
Transfer jar to refrigerator and allow to sit for another 3-4 weeks.
You can turn the jar upside down on occasion to distribute the liquid more evenly.
Once the rinds have softened your preserved lemons are ready to use.
These will keep in the fridge for at least a year.

To use your preserved lemons:
Remove a segment from the jar, rinse under cold water to remove excess salt, remove flesh from the peel,
then chop or mince as much of the peel as your recipe calls for.
Any unused portion of the whole lemon can
be returned the the jar.


Simple Smokey Preserved Lemon Vinaigrette
1/2c olive oil
1/4c apple cider vinegar
1tbsp finely minced preserved lemon rind
1 tsp finely minced garlic
1 tsp smoked salt (you can use a regular sea salt instead,
but the smoky flavor is amazing, so seek out smoked salt if you can)
pepper to taste

In a medium bowl whisk vinegar, garlic, and minced preserved lemon rind, and salt together.
Slowly add in olive oil, whisking until thickened.
Add pepper to taste, whisking to incorporate.

This is a perfect green salad dressing but also rocks the house over any fresh
chopped veggie/bean/grain salad you can think of.
Jarred preserved lemons, ready for adding to any recipe your little heart desires. 

Monday, December 3, 2012

Bourbon Pickled Cranberries

cranberry picklemania.
Spiced Bourbon Pickled Cranberries
Fresh cranberries and pickling spices: cinnamon, whole cloves, and black peppercorns.
It has been said before but bears repeating; I am a firm believer that almost any fruit or vegetable can be improved by pickling. I am also a firm believer than almost any dish can be improved by adding a wee bit of Bourbon. These pickled cranberries certainly prove both statements true. Fresh spiced cranberry sauce is a regular on my Thanksgiving table and I  always add a dash of  bourbon to top it off. Using the same flavor profiles, with the addition of cider vinegar, I whipped up this brining recipe. Boozy pickled cranberries! The first jar has only just been cracked open, but already my mind is spinning with the possibilities. While drinking a tonic spiked with pickled cranberries for breakfast this morning images of beautiful cranberry-topped cocktails were dancing through my head. I can also envision these as a great addition to a winter salad, an accompaniment to a holiday appetizer spread, even tossed into a batch of hot mulled cider.  I'll be stocking up on fresh cranberries before they disappear for the season and canning up a bunch of these for holiday gifts. 
Prepared canning jars and brined pickled cranberries, ready to pack. 
Spiced Bourbon Pickled Cranberries Recipe
(Yields 4 pints or 2 quart jars)

2 12oz bags of fresh cranberries
2 1/2c apple cider vinegar
2c organic vegan sugar
1/4c Bourbon/ Whiskey 
1/2tsp whole cloves
1/4 tsp black peppercorns
2-4 whole cinnamon sticks (1 per jar)

*One note for this recipe: save your leftover pickling liquid! It can be used to poach other fruits,
like pears or apples, or used to make a batch of refrigerator pickles.

Sterilize your canning jars and in a boiling water bath for 10 minutes. 
Prepare your lids and bands in a small saucepan of simmering water.  

If you are new to canning, here is a helpful page on preparing your jars:

In a medium saucepan combine vinegar, sugar and bourbon. 
Bring to a gentle boil over medium high heat.
Stir until all sugar is dissolved.
Add cloves and peppercorns to brine.
Add cranberries, stirring to combine and cook for 5 minutes, 
returning to a boil and stirring frequently. 
When cranberries begin to pop, remove from heat.

Pickled cranberries; packed, brined, and ready for their lids.

Once the sterilized jars are removed from the water bath, add 1 cinnamon stick to each.
Ladle pickled cranberries into prepared jars with a slotted spoon.
Pour remaining brine over the top of packed cranberries, 
leaving 1/2 inch of headspace in each jar.
Wipe the rims of your jars with a clean, damp cloth; then apply your lids and bands.
Place in boiling water bath, making sure jars are covered with at least 1 inch of water. 
Process for 10 minutes.

Remove jars from water bath once the processing time is up.
Place on a cooling rack or other heat surface.
Allow to cool for 24 hours.
Remove bands and check seals. Place any unsealed jars in the fridge.

Now you can eat 'em up!
Spiced bourbon pickled cranberries in tonic. Pretty close to perfect.