Showing posts with label pickles. Show all posts

Wednesday, August 27, 2014

Small Batch Spiny Gherkin Pickles & Doin' All The Things.

to old friends and new. 
Small Batch Spiny Gherkin Pickles
+
Doin' All The Things.
(also, i'm kinda famous now.)
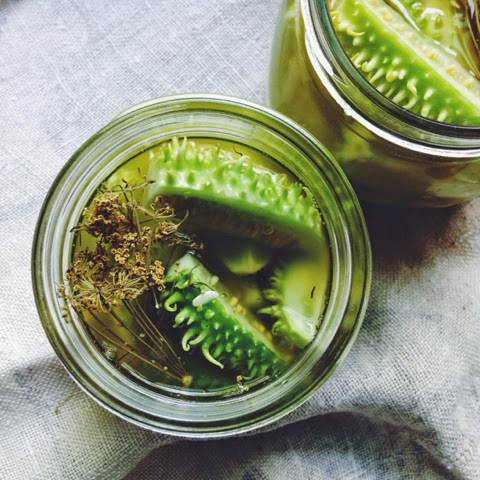
garlicky brine is always the answer.

I stumbled across these Hmong Farms-grown maxixie cucumbers at the Brookline farmers' market last week. After excitedly staring at them for a good two minutes I picked out what looked like a good bunch (?) and brought them to the cashier. My gleeful confusion was not exactly mirrored by the guy who sold them to me, but I would not be deterred. I had no idea what they were or what to do with them but was absolutely certain that they needed to be mine. Find a strange, vaguely Seussian variety of gherkin while doing your weekly produce shopping? 
The only option is to pickle the hell out of it. 

Garlicky Small Batch Spiny Gherkin 
(Maxixie Cucumber) Pickles
(makes one quart or two pints)

1 bunch spiny gherkins (also know as maxixe cucumbers), about 8
1c apple cider vinegar
1/4c water
4 garlic cloves, smashed
1 large head of dried dill, or 2 teaspoons dill seed
1Tbsp kosher salt
1tsp unrefined sugar
1/2tsp brown mustard seeds

Add garlic, mustard seeds and dill seeds to a clean quart canning jar, 
or distribute evenly between two pint jars.
Wash and thoroughly scrub gherkins, then cut lengthwise into quarters or eighths, 
depending on your pickle thickness preference.
Whisk together vinegar, water, salt and sugar until dissolved.
Stuff cucumber slices into jars, pouring water and vinegar mix over top until covered.
Cover jar(s) tightly, give them a good shake, and refrigerate.
The longer they sit, the more the flavors will develop.

all the pickled things.

Tuesday, June 18, 2013

Pickled Chard Stems

hell yes, we can pickle that.
Quick Pickled Chard Stems.
Chard stems: scrubbed, sliced and ready for pickling.


Get ready dear readers, it's chard week here in the slow club kitchen. Despite the best destructive efforts of the local slug population (slimy little fuckers), I've got a bumper crop this season. This is not a bad position to be in, but it does force a little on-your-feet thinking to avoid drowning in brightly colored leaves or becoming excruciatingly bored eating the same dish night after night. How to preserve this gorgeous bounty??  A stumbled-upon image of sriracha pickled chard stems on the Bon Appetit website was a miraculous revelation.
Of course, pickling is the answer!
PICKLING IS ALWAYS THE ANSWER.


I've hybridized a couple of recipes, this one from the New York Times, and the aforementioned sriracha pickled chard stems. The result is sweet, briny and spicy; enjoy them on their own, add the pickles to a summer noodle or salad dish or, if you're feeling a little on the ambitious side, pair with this raw pine nut goat cheese. 

So lets crank up some punk (the So So Glos' new album"Blowout" is my summer pickling soundtrack) and get down to brining.

Chard stems packed and ready for pickling brine.


Quick Pickled Chard Stems
(fills one 8oz canning jar)

1 cup of chard stems,
leaves removed
3/4c unseasoned rice vinegar
1/4c water
2Tbsp sugar
1Tbsp kosher salt
1/8tsp coriander seeds
1/8tsp black or pink peppercorns
1tsp sriracha

Wash and scrub chard stems and trim off any remaining bits of leaves. 
Slice stems into batons roughly the height of your canning jar, minus 1/4" for headspace. 
Pack stems into canning jar.


Combine vinegar, water, sugar, salt, spices and sriracha in a small sauce pan
and bring to a light boil.
Stir until sugar and salt has dissolved.
Pour hot brine over stems, cover and refrigerate.
Leave for at least 2 days and up to 2 weeks for flavors to develop before eating. 
Will keep for up to 1 month in the fridge.

The finished product.

Tuesday, February 12, 2013

Deconstructed Sushi Bowl

less work, more love
Deconstructed Sushi Bowl with Pickled 
Watermelon Radishes
Pickled watermelon radishes and onions with seasoned sushi rice.


In the spirit of Valentines Day, lets talk pink foods. Savory, sexy pink foods, to be specific. The watermelon radish falls neatly into all three of those categories. This dish has more than a handful of components, but the pickled watermelon radishes are undeniably the star; they add an intense depth of flavor without being overpowering (Recipe here: Slow Club Cookery's Pickled Watermelon Radishes). So here it is, the deconstructed sushi bowl. A bed of seasoned sushi rice topped with citrus, pickled watermelon radishes, onions and toasted nori strips. Wowza. Drizzle a little tamari over the top and there you have it, sushi in a bowl.
Easy, beautiful, done.
Sushi rice with rice vinegar and organic sugar. 

Deconstructed Sushi Bowl
(Serves 4)

2 cup sushi rice
2Tbsp unseasoned rice vinegar
2Tbsp organic sugar
1Tbsp kosher salt
1c pickled watermelon radishes, sliced
1 peeled navel orange, cut into segments
1 large toasted nori seaweed sheet,
cut into strips with kitchen scissors or
a VERY sharp knife, can also be crumbled
1 avocado sliced into 1/4" segments, optional
Tamari or soy sauce for serving


Preparing sushi rice:
Measure out sushi rice into medium saucepan.
Add enough water to cover, swirl and pour off water.
Repeat 2-3 times until water runs clean.
Add 2 cups of water, stir and bring to a boil.
Once boiling, cover and reduce heat to low.
Cook for 15 minutes.
Allow to stand for 10 minutes after cooking time is up.

Whisk sugar and salt into rice vinegar until dissolved.
Turn cooked sushi rice into large mixing bowl.
Pour rice vinegar over rice.
Using a wooden spoon, fold rice over itself allowing vinegar mix to coat all grains.
Allow rice to cool to room temperature.

Once sushi rice has cooled:
Place 1/2c of sushi rice in the bottom of each serving bowl.
Add 1/4 of the orange segments.
Top with 1/4cup of the matchsticked pickled watermelon radishes and onions.
Drizzle a little of the pickling liquid over top.
Finish off with a handful of nori strips and a drizzle of tamari.

Enjoy!
Finished dish, isn't that gorgeous??

Monday, December 3, 2012

Bourbon Pickled Cranberries

cranberry picklemania.
Spiced Bourbon Pickled Cranberries
Fresh cranberries and pickling spices: cinnamon, whole cloves, and black peppercorns.
It has been said before but bears repeating; I am a firm believer that almost any fruit or vegetable can be improved by pickling. I am also a firm believer than almost any dish can be improved by adding a wee bit of Bourbon. These pickled cranberries certainly prove both statements true. Fresh spiced cranberry sauce is a regular on my Thanksgiving table and I  always add a dash of  bourbon to top it off. Using the same flavor profiles, with the addition of cider vinegar, I whipped up this brining recipe. Boozy pickled cranberries! The first jar has only just been cracked open, but already my mind is spinning with the possibilities. While drinking a tonic spiked with pickled cranberries for breakfast this morning images of beautiful cranberry-topped cocktails were dancing through my head. I can also envision these as a great addition to a winter salad, an accompaniment to a holiday appetizer spread, even tossed into a batch of hot mulled cider.  I'll be stocking up on fresh cranberries before they disappear for the season and canning up a bunch of these for holiday gifts. 
Prepared canning jars and brined pickled cranberries, ready to pack. 
Spiced Bourbon Pickled Cranberries Recipe
(Yields 4 pints or 2 quart jars)

2 12oz bags of fresh cranberries
2 1/2c apple cider vinegar
2c organic vegan sugar
1/4c Bourbon/ Whiskey 
1/2tsp whole cloves
1/4 tsp black peppercorns
2-4 whole cinnamon sticks (1 per jar)

*One note for this recipe: save your leftover pickling liquid! It can be used to poach other fruits,
like pears or apples, or used to make a batch of refrigerator pickles.

Sterilize your canning jars and in a boiling water bath for 10 minutes. 
Prepare your lids and bands in a small saucepan of simmering water.  

If you are new to canning, here is a helpful page on preparing your jars:

In a medium saucepan combine vinegar, sugar and bourbon. 
Bring to a gentle boil over medium high heat.
Stir until all sugar is dissolved.
Add cloves and peppercorns to brine.
Add cranberries, stirring to combine and cook for 5 minutes, 
returning to a boil and stirring frequently. 
When cranberries begin to pop, remove from heat.

Pickled cranberries; packed, brined, and ready for their lids.

Once the sterilized jars are removed from the water bath, add 1 cinnamon stick to each.
Ladle pickled cranberries into prepared jars with a slotted spoon.
Pour remaining brine over the top of packed cranberries, 
leaving 1/2 inch of headspace in each jar.
Wipe the rims of your jars with a clean, damp cloth; then apply your lids and bands.
Place in boiling water bath, making sure jars are covered with at least 1 inch of water. 
Process for 10 minutes.

Remove jars from water bath once the processing time is up.
Place on a cooling rack or other heat surface.
Allow to cool for 24 hours.
Remove bands and check seals. Place any unsealed jars in the fridge.

Now you can eat 'em up!
Spiced bourbon pickled cranberries in tonic. Pretty close to perfect.

Monday, November 26, 2012

Momufuku Soy Pickled Shiitakes

pickles n' punk
Soy Sauce Pickled Shiitakes 

Today I decided to listen to some Fugazi and pickle some things. Sometimes you can't fight the urge, you know? I believe punk to be the perfect pickling/canning music and I'd like to think David Chang would agree. So in honor of the great Ian MacKaye, and with all credit to Mr. Chang, I give you my adaptation of Momufuku's soy sauce pickled shiitakes.
Soy sauce pickles??
Pure genius.


Now, I'm not going to order you to make these immediately, but I will strongly encourage you to do so. A handful of these tossed into a big bowl of white miso with rice noodles is one of my go-to meals year round.
I've also added them to many a noodle dish, both cold and hot.

Perfect every time.

If possible, get yourself to the local Asian grocery for ingredients. I purchased an 8oz bag (that is a LOT of dried mushrooms) for $8.00, as well as my ginger and soy sauce (always good to have on hand).
Stock up!
Trust me, you'll be making this recipe again very soon.
 
Soy Sauce Pickled Shiitakes 
(slightly) adapted from Momufuku

3 Cups loosely packed dried shiitakes (pre-sliced or whole caps)
1/2c vegan organic sugar
1/4c unseasoned rice vinegar
1/4c apple cider vinegar
1/2c tamari or soy sauce
2 small 1/2" knobs of ginger, peeled

Place dried shiitakes in a large bowl, cover with hot water.
Allow to rehydrate for 15-30 minutes.
Once mushrooms are softened, remove from liquid.
Remove stems and, if you have whole caps, cut into 1/4" thick slices.
Take liquid and pour through a fine mesh strainer to remove any debris and set aside.
In a medium saucepan combine vinegars, sugar, soy sauce and ginger.
Add in mushroom slices and 1c of the reserved cooking liquid.
Stir gently to combine.
Bring to a simmer over medium heat, then reduce and gently simmer for 30 minutes.
Allow mushrooms to cool in the cooking liquid then pack into a glass quart jar.
Add enough cooking liquid to cover.

Your pickles are ready to eat now (hooray!) but will also keep for
at least a month in the fridge.

Tuesday, November 13, 2012

Pickled Turnips

Middle Eastern Staple: Pickled Turnips
Beautiful local red turnips from the Egleston Winter Farmers Market.
Red turnips, scrubbed and ready for peeling and pickling.
In my almost two decades as a vegetarian I've conquered nearly all socially stigmatized vegetables- brussel sprouts, spinach, cabbage, and even the dreaded lima bean- but turnips have always been a bit of a mystery. I've tried a handful of turnip preparations over the years- turnip fries, turnip mash, roasted turnips- nothing has ever quite satisfied. That is, until I discovered that most magical of Middle Eastern accompaniments, pickled turnips. I am of the firm opinion that  any dish tastes better with a pickle, and pickled turnips are no exception
to this rule.


Crunchy, tart, and earthy- they add a deeper flavor profile to any Middle Eastern dish,  go perfectly with hummus,  and are a snap to make.They are traditionally prepared with white turnips, and get their pinkish hue from a couple slices of beet added to the jar during prep.

 I discovered these red turnips at the Egleston Winter Farmer's market this weekend and decided to give them a try instead. I believe the taste and texture will be the same,  and they are already a bit pink, which is a nice bonus. For this recipe I used a fairly traditional brine and added fresh garlic and bay to the jar.

Recipe:
Middle Eastern Pickled Turnips (Turshi Left)

Approximately 2lbs of turnips- scrubbed, peeled, and cut into matchsticks
1 small beet- scrubbed, peeled and similarly sliced
2-3 cloves of garlic- sliced thinly

2 1/2 cups of white vinegar
1 1/4 cups of water
1/3 cup kosher salt

bay leaf (optional)


Place garlic slices, bay leaf, sliced turnips and beets into a clean, sterilized 2 quart jar.
Combine water, vinegar, and salt in medium saucepan and bring to a boil, stirring until salt is dissolved.
Pour hot brine into over turnips and allow to cool to room temperature.
Once jar is cooled, cover and find a cool dark place to store for one week to allow the pickles to properly cure and the flavors to blend.
The pickles will look very light pink at first, but the beet slices will darken their color over the week.
Once the week is up, the pickles can be stored in the refrigerator for up to six weeks, though I doubt they'll stay uneaten for that long.

Enjoy on their own as a quick snack, as part of a mezze plate, or wrapped up in a Middle Eastern sandwich- they are an outstanding addition to hummus and compliment stuffed grape leaves beautifully as well.